
Redirecting an Existing Printer to another port
Sometime the printer IP address changed, so instead of reinstalling the printer, changing the port in which is uses can save time and the driver does not need to be reloaded.
Redirect to another TCP/IP port
Redirect to another TCP/IP port

- Start | Settings | Printers and Faxes
- Right click on the Printer that you want to redirect and select Properties
Windows 7
1. Start | Devices and Printers
2. Right click on the Printer that you want to redirect and select Printer Properties
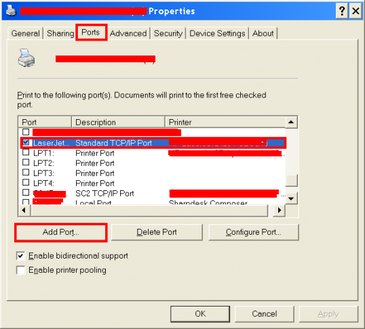
3. Click Ports tab and click Add Port
Note: If you want to redirect to an existing port, just check the box and click Apply. Once you do that you do not need to do anything else pass step 3.
Note: If you want to redirect to an existing port, just check the box and click Apply. Once you do that you do not need to do anything else pass step 3.
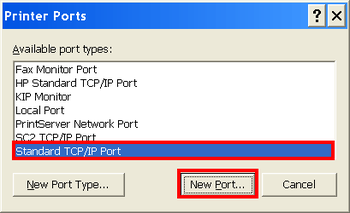
4. Select Standard TCP/IP Port and click New Port

5. Click Next

6. Assign the Printer Name or IP Address. You can change the Port Name or go with the default. Click Next

7. Click Next

8. Click Finish
9. Click Close
9. Click Close

10. Notice that the Printer have been redirect to the new IP Address Port. Click Apply and Close
Redirecting to a local port
Redirecting to a local port

1. Click Ports tab and click Add Port
Note: If you want to redirect to an existing port, just check the box and click Apply. Once you do that you do not need to do anything else pass step 1.
Note: If you want to redirect to an existing port, just check the box and click Apply. Once you do that you do not need to do anything else pass step 1.

2. Select Local Port and click New Port

3. Enter a port name and click OK

4. Notice the printer has been redirecting to the Local Port. Click Apply and Close.
